Use the Enable-WindowsOptionalFeature cmdlet in PowerShell to enable or restores an optional feature in a Windows image. Use the Online parameter to specify the running operating system on your local computer or the Path parameter to specify the location of a mounted Windows image.
The Enable-WindowsOptionalFeature enable an optional feature in the running operating system, enable hyper-v in the Windows operating system, and restore an optional feature.
The Enable-WindowsOptionalFeature syntax contains parameters that can be used to specify feature name, package name, online, package path, path, windows directory, and log level.
In this article, we will discuss how to use the Enable-WindowsOptionalFeature cmdlet in PowerShell to enable optional features such as hyper-v, netfx3, .net3.5, rsat and many others on running operating system.
Cool Tip: The Enable-WindowsOptionalFeature requires elevation. You must open the PowerShell terminal as “Run as administrator” to run the cmdlet.
What is the Syntax of Enable-WindowsOptionalFeature
The syntax of Enable-WindowsOptionalFeature is given below.
Enable-WindowsOptionalFeature
      -FeatureName <String[]>
      [-PackageName <String>]
      [-All]
      [-LimitAccess]
      [-Source <String[]>]
      [-NoRestart]

      -Path <String>
      [-Online]
      [-WindowsDirectory <String>]
      [-SystemDrive <String>]
      [-LogPath <String>]
      [-ScratchDirectory <String>]
      [-LogLevel <LogLevel>]
      [<CommonParameters>]
Parameters used in the Enable-WindowsOptionalFeature are given below.
-FeatureName: The name of a feature to be enabled. Feature names are case-sensitive.
-PackageName: The name of the package as it is listed in the Windows image.
-Path: It specifies the full path to the root directory of the offline Windows image that you will service.
-Online: Use the Online parameter to specify the running operating system on your local computer.
-LogPath: It specifies the full path and file name to log to. If not set, then it uses the default path as %WINDIR%\Logs\Dism\dism.log.
-ScratchDirectory: It specifies the temporary directory that will be used while extracting files for use during servicing. The directory must exist locally. If it is not specified, it will use %Windows\%Temp%.
Let’s understand the PowerShell Enable-WindowsOptionalFeature cmdlet in the DISM module with examples. In the below examples, we will use the command to enable optional features in the running operating system, on the mounted image, and restores an optional feature.
How to Enable an Optional Feature in the Running Operating System
Use the Enable-WindowsOptionalFeature cmdlet in PowerShell to enable an optional feature in the running operating system.
Enable-WindowsOptionalFeature -Online -FeatureName "Hearts" -All
In the above PowerShell script, the Enable-WindowsOptionalFeature command enables the optional feature, Hearts, and the dependencies of the parent feature in the running Windows operating system.
Enable an Optional Feature NetFx3 in the Windows Operating System
You can use Enable-WindowsOptionalFeature to enable NetFx3 ( .net framework 3.5) on the Windows operating system.
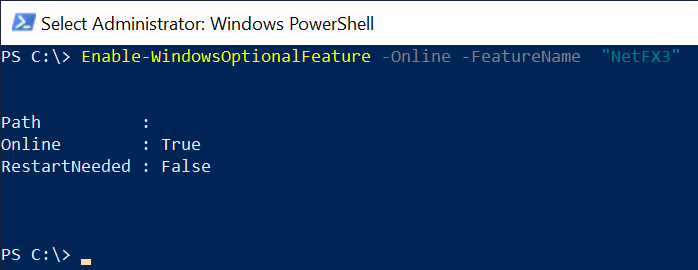
Enable-WindowsOptionalFeature -Online -FeatureName "NetFX3"
In the above PowerShell script, Enable-WindowsOptionalFeature uses the parameters -Online to specify the running operating system and FeatureName as “NetFx3” to enable the given feature in the Windows operating system.
The output of the above PowerShell script to enable NetFx3 on Windows OS is:

How to Enable Hyper-V on Windows OS using PowerShell
To enable Hyper-V using PowerShell on the Windows operating system, use the Enable-WindowsOptionalFeature and specify the “Microsoft-Hyper-V-All” feature name. It will enable hyper-v, a restart of the computer is required to complete the operation.
Enable-WindowsOptionalFeature -Online -FeatureName "Microsoft-Hyper-V-All"
In the above PowerShell script, the Enable-WindowsOptionalFeature command enables the optional feature, Hyper-V on the Windows operating system.
After enabling Hyper-V on the running operating system, a restart is needed.
Cool Tip: How to use Get-WindowsOptionalFeature to check the status of an optional feature in PowerShell!
How to Restore an Optional Feature
To restore an optional feature using PowerShell, use the Enable-WindowsOptionalFeature and specify the FeatureName and Source parameters.
Enable-WindowsOptionalFeature -Path "C:\offline" -FeatureName "TestFeature" -Source "C:\mount" -LimitAccess
In the above PowerShell script, the Enable-WindowsOptionalFeature command restores the optional feature, “TestFeature”, to the Windows image that is mounted to C:\offline using the source files from another Windows image that is mounted to C:\mount.
Cool Tip: How to disable Windows optional feature using PowerShell!
Conclusion
I hope the above article on how to enable Windows optional feature using the PowerShell Enable-WindowsOptionalFeature is helpful to you.
We have learned how to use the cmdlet Enable-WindowsOptionalFeature in PowerShell to enable optional features, enable Hyper-V features in the running operating system, and a mounted image using different parameters.
You can find more topics about PowerShell Active Directory commands and PowerShell basics on the ShellGeek home page.